Here is the step-by-step guide on how a new vendor will fill out an Onboarding form.
- Vendor Onboarding Invitation
- Vendor Onboarding Form – Registration
- Vendor Onboarding Form – Onboarding Progress
- Vendor Onboarding Form – Company Information
- Vendor Onboarding Form – Payment Details
- Vendor Onboarding Form – Customer Requested Additional Information
- Vendor Onboarding Form – Verification
Vendor Onboarding Invitation
-
Open the Onboarding Invitation email and click on Click here to onboard now to start the process
Vendor Onboarding Form – Registration
- Tick if you do not have an EIN
- Input your EIN, main Trading Name, and your First and Last Name
- Your email address is prepopulated, this will be your username the next time you log in
- Create a password ensuring it meets the password requirements and
-
Click Register
Items with an asterisk (*) are required fields
Vendor Onboarding Form – Onboarding Progress
This indicates your Onboarding progress. You can click on any of the four sections to go back and make changes once that section is completed.
Green – Completed
Orange – In Progress/Incomplete
Vendor Onboarding Form – Company Information
-
Complete the Physical and Post Address sections
-
Complete the Organization Information, Other Information sections and click Continue
Vendor Onboarding Form – Payment Details
-
Enter bank account details manually or via the bank link
Manual
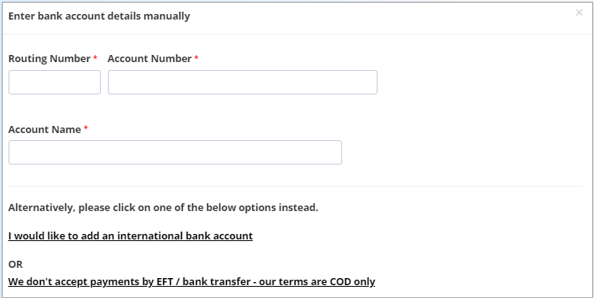
Bank Link
Vendor Onboarding Form – Customer Requested Additional Information
Complete the Additional Information section. The Customer may require specific additional information. This could be documentation requirements, agreeing to their Terms & Conditions, invoices, etc. Any additional requirements from the Customer will appear in this section.
- If the form has a section asking for documentation, click on Upload new file to submit the requested file.
(If you have submitted this same documentation for other Customers, click on Select previously uploaded file.)
The following pop-up will appear.
- Click Select File to attach the requested document from your computer.
- Add a Title for your attached document.
- Click on the calendar icon to choose the expiry date (must be a future date).
- Click Upload
The Additional Information section will update with the information regarding the uploaded file.
-
Confirm your Company Representative Details by entering your position, confirming that you are an authorized representative, and clicking Continue.
A reference number will be generated which will be requested during the verification phone call.
Supplier Onboarding Form – Verification
Once finalized, the Onboarding Form will go to our Verifications Team to Verify your details and you will receive the following email.
We may call you to verify the provided details. If we do, the caller will provide the reference number outlined in the email you receive.